Ardupilot Scheduler

文章目录
参考 Ardupilot 官方开发文档中关于 Threading 的文档,把 Ardupilot 中关于调度器和线程相关的代码阅读了一下,做了点笔记。
0x00->Overview
关于 Ardupilot 的调度器可以分成三个层次去理解。首先,最高层次,即实现在航行器特定代码层的 AP_Scheduler;然后是实现在 HAL 层的基于不同操作系统的 HAL::Scheduler,最后是实现在 HAL 层的基于不同操作系统的 HAL::Scheduler::thread_create()。这一层只是对操作系统提供的创建线程的接口做了一层包裹。
开始之前,我们先来看看一个 Ardupilot 程序是从哪里开始运行的。
Hint
本文所有代码均以 Ardupilot 最新代码库中的 ArduSub 为例。 同时,由于我现在是使用 Pixhawk 的硬件,在最新本版的 Ardupilot 中已经放弃使用 NuttX 而使用 ChibiOS 了,所以 `HAL` 相关的代码都以 `HAL_ChibiOS` 为例。
Important
为了精简篇幅,文中代码会在不影响理解的前提下做部分精简。实际代码请查阅代码库。
在 ArduSub.cpp 文件中可以看到有下面两个函数:
void Sub::setup(){
  // code
  }

void Sub::loop(){
  // code
  }
了解过 Arduno 的可能会感觉到很熟悉。这套东西就是从 Arduno 那里继承来的。最早 Ardupilot 就是基于 Arduno 的,从名字也可以看出来,这其实是 Arduno 和 Autopilot 两者的结合。Ardupilot 通过 AP_HAL_MAIN() 或 AP_HAL_MAIN_CALLBACKS() 两个宏函数将将 setup() 和 loop() 绑定到主函数。其中 AP_HAL_MAIN() 用于纯 C 语言环境,AP_HAL_MAIN_CALLBACKS() 用于 C++ 中实例的成员函数。
// file: libraries/AP_HAL/AP_HAL_Main.h
#ifndef AP_MAIN
#define AP_MAIN main
#endif

#define AP_HAL_MAIN() \
    AP_HAL::HAL::FunCallbacks callbacks(setup, loop); \
    extern "C" {                               \
    int AP_MAIN(int argc, char* const argv[]); \
    int AP_MAIN(int argc, char* const argv[]) { \
        hal.run(argc, argv, &callbacks); \
        return 0; \
    } \
    }

#define AP_HAL_MAIN_CALLBACKS(CALLBACKS) extern "C" { \
    int AP_MAIN(int argc, char* const argv[]); \
    int AP_MAIN(int argc, char* const argv[]) { \
        hal.run(argc, argv, CALLBACKS); \
        return 0; \
    } \
    }

// file: libraries/AP_HAL/HAL.h

class AP_HAL::HAL {
struct FunCallbacks : public Callbacks {
    FunCallbacks(void (*setup_fun)(void), void (*loop_fun)(void));

    void setup() override { _setup(); }
    void loop() override { _loop(); }

private:
    void (*_setup)(void);
    void (*_loop)(void);
    };
}

// file: libraries/AP_HAL/HAL.cpp
namespace AP_HAL {
HAL::FunCallbacks::FunCallbacks(void (*setup_fun)(void), void (*loop_fun)(void))
    : _setup(setup_fun)  //参数初始化表
    , _loop(loop_fun)
{
    assert(setup_fun);
    assert(loop_fun);
}
}
AP_HAL_MAIN();
// 或者
// flie: ArduSub/ArduSub.cpp
AP_HAL_MAIN_CALLBACKS(&sub);
这两个宏函数展开后如下
// AP_HAL_MAIN()
AP_HAL::HAL::FunCallbacks callbacks(setup, loop);
int main(int argc, char* const argv[]);
int main(int argc, char* const argv[])
{
  hal.run(argc, argv, &callbacks);
  return 0;
}

// AP_HAL_MAIN_CALLBACKS(&sub)
int main(int argc, char* const argv[]);
int main(int argc, char* const argv[])
{
  hal.run(argc, argv, &sub);
  return 0;
}
观察 AP_HAL_MAIN() 可以发现,首先是实例化了一个 callbacks 实例,然后将这个实例传给了 hal.run()。而 AP_HAL_MAIN_CALLBACKS(&sub) 则是直接将 sub 传给了 hal.run()。这是因为, Sub 这个类本来就是 AP_HAL::HAL::FunCallbacks 的子类。
// file: ArduSub/Sub.h
class Sub : public AP_HAL::HAL::Callbacks {
}
// file: ArduSub/Sub.cpp
Sub sub;
接下来,我们来看 hal.run() 都干了啥。
void HAL_ChibiOS::run(int argc, char * const argv[], Callbacks* callbacks) const
{
  // 将 callbacks 赋值给 g_callbacks
  g_callbacks = callbacks;

  // 调用 main_loop() 接管 main 函数.
  //Takeover main
  main_loop();
}
static void main_loop()
{
  // 一些初始化工作, 包括串口等硬件
  hal.uartA->begin(115200);
  hal.uartB->begin(38400);
  hal.uartC->begin(57600);

  hal.scheduler->init();

  // 执行 setup
  g_callbacks->setup();

  // 进入死循环, 执行 loop
  while (true) {
    g_callbacks->loop();
    // 一些延时
    hal.scheduler->delay_microseconds(50);
  }
}
至此,我们一层层把 Ardupilot 的 main 函数找出来了。
接下来,将从前文提到的三个层次分别做相关的说明。
0x01->AP_Scheduler
首先 AP_Scheduler 是作为一个库存在于 Ardupilot 中的。具体位置为 libraries/AP_Scheduler。
AP_Scheduler 的核心思想是,将时间分块,根据任务表中的任务和当前时间片段的剩余时间决定那个任务执行。
scheduler table
任务表 (scheduler table) 就是需要执行的任务 (task) 函数以及任务执行的频率和任务执行所需要的最大可能的时间 (最坏的情况) 。
一个任务表的样子如下:
// file: ArduSub/ArduSub.cpp
#define SCHED_TASK(func, rate_hz, max_time_micros) SCHED_TASK_CLASS(Sub, &sub, func, rate_hz, max_time_micros)

#define SCHED_TASK_CLASS(classname, classptr, func, _rate_hz, _max_time_micros) { \
    .function = FUNCTOR_BIND(classptr, &classname::func, void),\
    AP_SCHEDULER_NAME_INITIALIZER(func)\
    .rate_hz = _rate_hz,\
    .max_time_micros = _max_time_micros\
}

const AP_Scheduler::Task Sub::scheduler_tasks[] = {
  SCHED_TASK(fifty_hz_loop,         50,     75),
  SCHED_TASK(update_GPS,            50,    200),
  SCHED_TASK(three_hz_loop,          3,     75),
  SCHED_TASK_CLASS(GCS,      (GCS*)&sub._gcs,   update_receive,     400, 180),
};
列表中的函数必须遵循如下几点:
1. 永远不能阻塞;
2. 永远不能 sleep;
3. 最坏情况下的执行时间必须是可预测的。
loop
AP_Scheduler 的基本原理是周期性地调用 loop 函数,这个函数决定那个任务执行。我们下面来看一下 loop 函数。
// file: libraries/AP_Scheduler.cpp
void AP_Scheduler::loop()
{
    // wait for an INS sample
    AP::ins().wait_for_sample();

    const uint32_t sample_time_us = AP_HAL::micros();

    if (_loop_timer_start_us == 0) {
        _loop_timer_start_us = sample_time_us;
        _last_loop_time_s = get_loop_period_s();
    } else {
        _last_loop_time_s = (sample_time_us - _loop_timer_start_us) * 1.0e-6;
    }

    // Execute the fast loop
    // ---------------------
    if (_fastloop_fn) {
        _fastloop_fn();
    }

    // tell the scheduler one tick has passed
    tick();

    // run all the tasks that are due to run. Note that we only
    // have to call this once per loop, as the tasks are scheduled
    // in multiples of the main loop tick. So if they don't run on
    // the first call to the scheduler they won't run on a later
    // call until scheduler.tick() is called again
    const uint32_t loop_us = get_loop_period_us();
    const uint32_t time_available = (sample_time_us + loop_us) - AP_HAL::micros();
    run(time_available > loop_us ? 0u : time_available);

    // check loop time
    perf_info.check_loop_time(sample_time_us - _loop_timer_start_us);

    _loop_timer_start_us = sample_time_us;
}
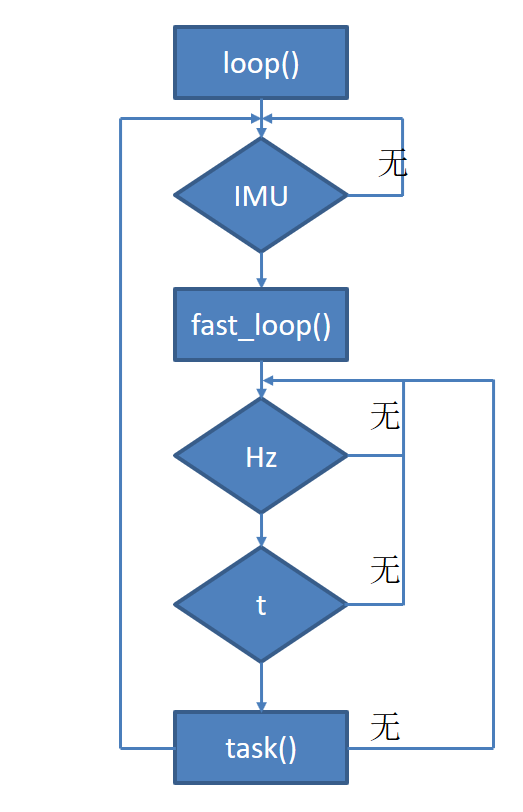
- 进入 loop 首先等待 IMU 的数据,IMU 的数据是每隔 25ms 来一次,即执行的频率是 400Hz。
- 然后记录一下拿到 IMU 数据的时间,计算一下上一个循环具体用了多长时间,这个循环时间应该是用来看主循环的负载的,不参与调度器的逻辑控制。
- 接下来执行
fast_loop()。 - 通知 scheduler 已经走了一个 tick。
- 计算这个循环还剩余的时间,将剩余时间传递给 run 函数,run 函数具体判断每个任务需不需要执行。
- 最后检查一下循环的时间 (用处?),并记录一下循环开始的时间。
基本流程是首先等待 IMU 数据,有了数据后执行 fast_loop(),然后开始执行任务表中的任务。一个简单的流程图如下所示:
AP_Scheduler
fast_loop
fast_loop() 是在 AP_Scheduler 初始化时传递的:
// file: ArduSub/Sub.h
// main loop scheduler
AP_Scheduler scheduler{FUNCTOR_BIND_MEMBER(&Sub::fast_loop, void)};
fast_loop() 是主线程的唯一一个肯定能运行的任务,所以一些重要的任务必须放到这里面来执行,而其他一些重要性不是很高的任务则可以放到任务表里面,根据实际情况决定是否运行。 ArduSub 的 fast_loop() 代码如下:
void Sub::fast_loop()
{
    // update INS immediately to get current gyro data populated
    ins.update();

    if (control_mode != MANUAL) { //don't run rate controller in manual mode
        // run low level rate controllers that only require IMU data
        attitude_control.rate_controller_run();
    }

    // send outputs to the motors library
    motors_output();

    // run EKF state estimator (expensive)
    // --------------------
    read_AHRS();

    // Inertial Nav
    // --------------------
    read_inertia();

    // check if ekf has reset target heading
    check_ekf_yaw_reset();

    // run the attitude controllers
    update_flight_mode();

    // update home from EKF if necessary
    update_home_from_EKF();

    // check if we've reached the surface or bottom
    update_surface_and_bottom_detector();

#if MOUNT == ENABLED
    // camera mount's fast update
    camera_mount.update_fast();
#endif

    // log sensor health
    if (should_log(MASK_LOG_ANY)) {
        Log_Sensor_Health();
    }
}
wait_for_sample
实际上 wait_for_sample() 除了再上面 loop 中调用了,还在 fast_loop 也调用了 (ins.update()中)。但是由于 wait_for_sample() 中有一个判断,如果 IMU 的数据没有被取走,是不用等待的,所以其实第二次调用时无效的,直接跳过了。这么做的原因可能是与其他版本相兼容?猜测可能有的航行器实现不需要等待 IMU 数据,同时为了满足这种航行器的调度保证兼容。
按照官方的文档说法,ins.wait_for_sample() 是驱动 AP_Scheduler 运行的节拍器(metronome)。
另外,AP_Scheduler 节拍的大小是在飞控启动时由 LOOP_RATE 参数决定的。具体代码如下:
// file: ArduSub/Sub.h
AP_InertialSensor ins;

// file: ArduSub/ArduSub.cpp
void Sub::setup()
{
  ...
  init_ardupilot();
  ...
}

// file: ArduSub/system.cpp
void Sub::init_ardupilot()
{
  ...
  startup_INS_ground();
  ...
}

void Sub::startup_INS_ground()
{
  ...
  ins.init(scheduler.get_loop_rate_hz());
  ...
}

// file libraries/AP_Scheduler/AP_Scheduler.h
// get the active main loop rate
uint16_t get_loop_rate_hz(void) {
  if (_active_loop_rate_hz == 0) {
      _active_loop_rate_hz = _loop_rate_hz;
  }
  return _active_loop_rate_hz;
}

// overall scheduling rate in Hz
AP_Int16 _loop_rate_hz;
// loop rate in Hz as set at startup
AP_Int16 _active_loop_rate_hz;

// LOOP_RATE 参数决定节拍的大小
// file: libraries/AP_Scheduler/AP_Scheduler.cpp
const AP_Param::GroupInfo AP_Scheduler::var_info[] = {
  ...
  AP_GROUPINFO("LOOP_RATE",  1, AP_Scheduler, _loop_rate_hz, SCHEDULER_DEFAULT_LOOP_RATE),
  AP_GROUPEND
};

// 关于 AP_Int16 这是一个宏定义,具体追究起来还要涉及 AP_ParamT 模板类以及基类 AP_Param,
// 这里暂时不深究了。可以确定的是 _active_loop_rate_hz 在初始化的时候已经被设为 0 了,所以
// _active_loop_rate_hz 的值在启动时 LOOP_RATE 参数决定的。
// file: libraries/AP_Param/AP_Param.h
// declare a scalar type
// _t is the base type
// _suffix is the suffix on the AP_* type name
// _pt is the enum ap_var_type type
#define AP_PARAMDEF(_t, _suffix, _pt)   typedef AP_ParamT<_t, _pt> AP_ ## _suffix;

AP_PARAMDEF(int16_t, Int16, AP_PARAM_INT16);  // defines AP_Int16
api
AP_Scheduler 提供了一个非常有用的成员函数和一个成员变量:
float load_average();

// current running task, or -1 if none.
static int8_t current_task;
load_average() 可以返回调度的负载,计算方法是这一个节拍中实际执行任务的时间除以节拍的总时间。要注意的是这个负载只是调度器线程的负载,整个飞控的负载无法通过这一个线程得知。
current_task 可以用来得知当前执行的任务是哪一个,主要是用来调试任务表中的任务是否由任务阻塞了等等。
0x02->HAL::Scheduler
说完了最上层的 AP_Scheduler ,我们现在来看一看 实现在 HAL 层的 Scheduler。
class ChibiOS::Scheduler : public AP_HAL::Scheduler {
  ...
}
ChibiOS 的 Scheduler 继承自 AP_HAL::Scheduler,大部分函数都重写了,保留了了一个 register_delay_callback() ,关于这个成员函数我们后面再说。
timer_process
void register_timer_process(AP_HAL::MemberProc); 用来注册一个定时器回调函数。这个定时器的执行频率是 1kHz。执行的逻辑很简单,在定时器线程中。首先获取定时器回调函数的数量,然后依次执行回调函数。要注意的是这个线程的频率并不是严格的 1kHz,因为定时的实现方法是在定时器线程中固定延时 1ms,回调函数的执行时间没有包括在内。这是一个比较重要的函数,主要是用来方便编写基于定时器的驱动程序。回调函数的上限为 #define CHIBIOS_SCHEDULER_MAX_TIMER_PROCS 8
io_process
void register_io_process(AP_HAL::MemberProc); 用来注册一个 IO 回调函数。官方文档的说法是这个函数可以用来注册一些执行频率较低的函数。但是实际代码中的执行频率也是 1kHz。文档中有不少东西都过时了。执行逻辑和 timer_process 是一样的。回调函数上限同 timer_process。
other thread
观察 void Scheduler::init() 得知除了上述两个线程外,还有 rcin_thread storage_thread ,执行的频率分别为 400Hz 和 100Hz。
通过 thread_create 中的 priority_map 大概可以看到会有哪几个线程,具体的线程我们就不去探究了。
static const struct {
  priority_base base;
  uint8_t p;
} priority_map[] = {
    { PRIORITY_BOOST, APM_MAIN_PRIORITY_BOOST},
    { PRIORITY_MAIN, APM_MAIN_PRIORITY},
    { PRIORITY_SPI, APM_SPI_PRIORITY},
    { PRIORITY_I2C, APM_I2C_PRIORITY},
    { PRIORITY_CAN, APM_CAN_PRIORITY},
    { PRIORITY_TIMER, APM_TIMER_PRIORITY},
    { PRIORITY_RCIN, APM_RCIN_PRIORITY},
    { PRIORITY_IO, APM_IO_PRIORITY},
    { PRIORITY_UART, APM_UART_PRIORITY},
    { PRIORITY_STORAGE, APM_STORAGE_PRIORITY},
    { PRIORITY_SCRIPTING, APM_SCRIPTING_PRIORITY},
  };
比较奇怪的是,串口驱动直接用的 thread_create_alloc() 接口,而不是更高一个层级的 Scheduler::thread_create()。关于 thread_create_alloc(),这是一个在 ChibiOS 上的一层 hwdef,具体所在的位置是 libraries/AP_HAL_ChibiOS/hwdf 。
0x03->thread_create
ChibiOS::Scheduler 中定义了创建线程的函数 Scheduler::thread_create(),除了这个函数还有上面提到的 位于 hwdef 的 thread_create_alloc()。
其实看了一圈下来,在 Ardupilot 的开发中需要自己创建线程的需求并不大,一般任务表的定时器回调函数就够用了。本来想着线程这单成一章,但其实内容并不是太多。但是该说的还是要提一下。说到多线程就不得不说一下线程间同步以及数据的一致性。这两方面也没啥特别的,就是一些常用的方法。
semaphore
信号量,一个常用的线程间同步的方法。一个使用的例子如下:
binary_semaphore_t _timer_semaphore;

// wait for semaphore to be available
chBSemWait(&_timer_semaphore);

// do something here

// release semaphore
chBSemSignal(&_timer_semaphore);
lockless
文档中说 ArduPilot 使用不需加锁的数据结构,但是由于文档过期了,并没有在代码找到使用的例子。同时还提到了对于串口等需要读写缓存的地方可以使用环形缓冲区。
0x04->nutshell
简单来说就是能用任务列表的就不用定时器回调,能用定时器回调的就不要自己创建线程。只是在任务列表中互相访问数据的话可以不用考虑线程间同步的问题,一旦用到定时器回调以及自己创建线程就必须考虑线程间同步。
0x05->upcoming
- 整体架构
- 如何将自己写的代码嵌入到 ArduPilot 中
- AP_Motors6DOF 的理解